Open Dev Kit Documentation :: Demo - 3D Space Shooter
2D and 3D physics-based space shooter game utilizing OpenGL and Jolt 3D physics. The game offers both 3D and 2D gameplay modes, but always takes place in a fully 3D space. The goal is to survive waves of enemies, earn points by destroying ships, and collect power-ups to enhance firepower or restore shields. Over time, the game increases in difficulty by introducing stronger enemies and higher spawn rates.How it Works
- Game Initialization
- Upon starting the game, the
Start function is triggered. This initializes theGameplay scene, the spaceship's position as well as playing the demo's main music theme. Menu navigation is handled by theTitleScreen keybinds resource set to be the default one in theTools > Project Options . - Mode Selection
- While in the title screen, hovering the cursor over 2D or 3D will switch the camera's perspective by changing the
gSideView variable. Then, actual changes to the camera will occur within the variable's Setter script (which executes every time the variable's value is changed) via anInterpolate function at the bottom of the script with"App.Scenes.Gameplay.DefaultCamera.Orientation" set forExpression . Activating either option will trigger theStartGame function, which actually initializes the gameplay by switching scenes (removing theTitleScreen and making theHUD scene visible), switching controls from menu navigation to gameplay, and initializing variables required for gameplay progression like difficulty and the spawn timer. - Enemy Spawning
- After a game-mode is selected and the game begins, the
gSpawnTimer timer that can be found inTools > Globals / API is responsible for spawning new enemy spaceships as well as increasing the difficulty over time. This is done by incrementing thegDifficulty variable, or making thegSpawnTimer run more frequently by decreasing its interval, thus increasing its tickrate. Spawned ships and even bullets for that matter, are using theShip andBullet classes respectively as a base.
Adding a New Enemy
Follow these steps to add a new spawnable enemy spaceship to the demo:
- Add the New Enemy Model:
- Open
Tools > Resources . - Double-click the
Objects sprite-set resource. - Copy either the 2nd or 3rd square tile both of which are enemy ship models, and paste it over to a blank tile. We'll be using that as a base for the new enemy, since we want to keep certain things like collision and the "Destroyed" animation and only change the model.
- Click the model on the sequencer view to select it, then hit the delete key to remove it.
- Click the
Import Images/Model icon to import your graphic model. You may have to configure its scale and rotation. - Now repeat the previous 2 steps for the "Destroyed" pose as well.
- Open
- Set up the New Enemy Ship:
- Open
Tools > Globals / API . - Open the "Ships" folder and copy+paste the
gEnemySquareShip variable. - Give it a different name and make sure to change its model to the new one by setting
Tile to4 if the new object was created on the 5th tile (the count starts from 0, therefore the 5th tile's # would be 4). - Select the
gSpawnTimer variable and double-click itsTicked event to open the script and add the new one as a spawning option. - Somewhere in the middle of the script, you will find a
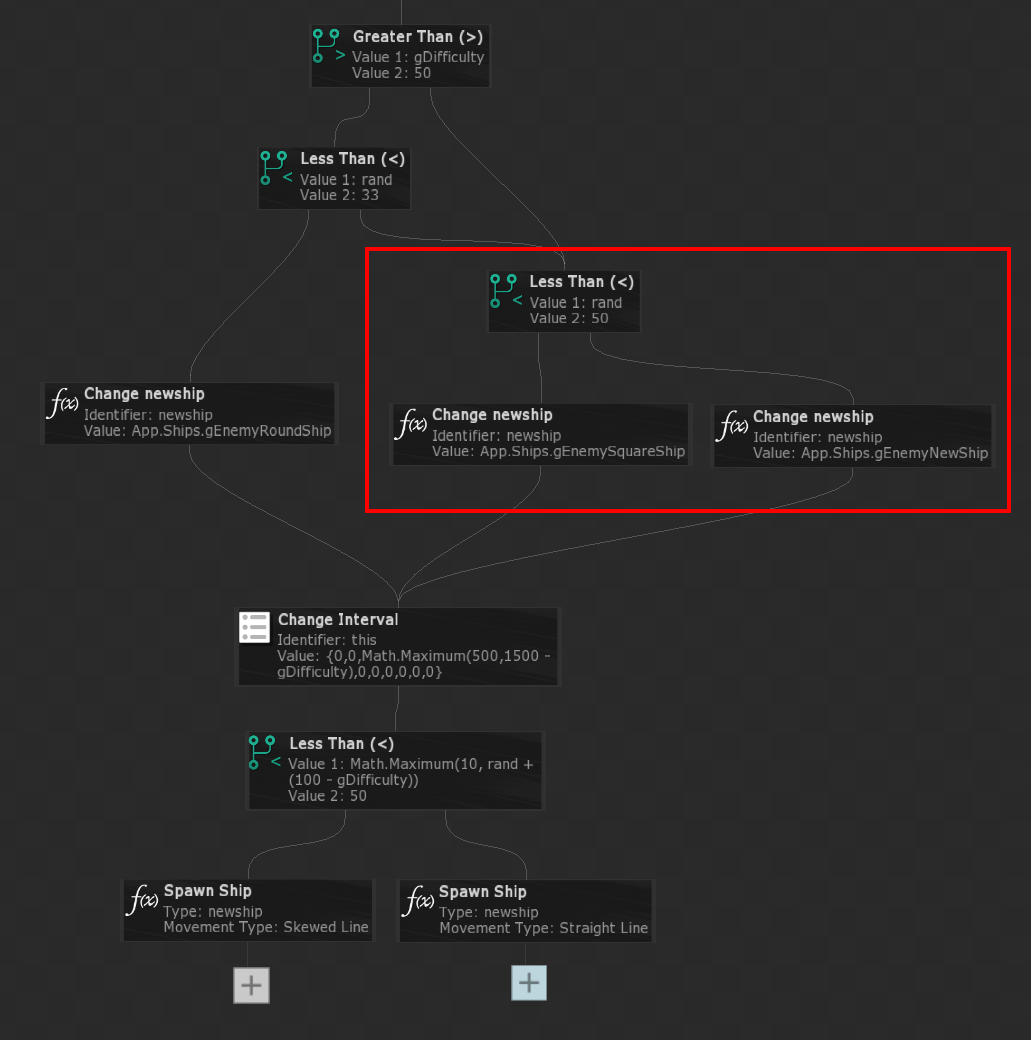
Greater Than (>) branch (found under theGeneral category or by using the search filter) followed by aLess Than (<) branch which is then followed by 2Change newship functions (found under theApp category or by using the search filter). - On the right side of the comparison branches, connect another
Less Than (<) branch but set its second value to50 . We want to make it so that there is a 50/50 chance to spawn either a square ship or the new ship, when a round ship isn't chosen for spawning. - Now connect its one side to the
Change newship function with a value of "App.Ships.gEnemySquareShip", and a new one with a value ofApp.Ships.[name of your new ship here] . - Make sure the new function is connected to the very next one (
Change Interval in this case) so the script continues smoothly. The updated script should look like this:

- Open
- Test the Game:
- Run the project to verify the new ship spawns and behaves as expected.
Adding a New Powerup
Follow these steps to add a new spawnable powerup to the demo:
- Add the New Powerup Graphic:
- Open
Tools > Resources . - Double-click the
Powerups sprite-set. - Copy the 1st of the 3 existing powerups and paste it over to a blank tile. You can import your own graphic of course or .efkefc file, but in this case we'll be using an existing one which is for shields. It conveniently has the "S" letter for a graphic, which matches the super-speed powerup we want to implement.
- Select the effect on the sequencer and on the properties panel set its
Color to something fitting, like full yellow.
- Open
- Set up the New Powerup:
- Open
Tools > Globals / API . - Open the "Collectables" folder and copy+paste the
gHealth variable. - Change its name to
gSuper and make sure to change its graphic to the new one by settingTile to3 if the new object was created on the 4th tile (the count starts from 0, therefore the 4th tile's # would be 3). - Select
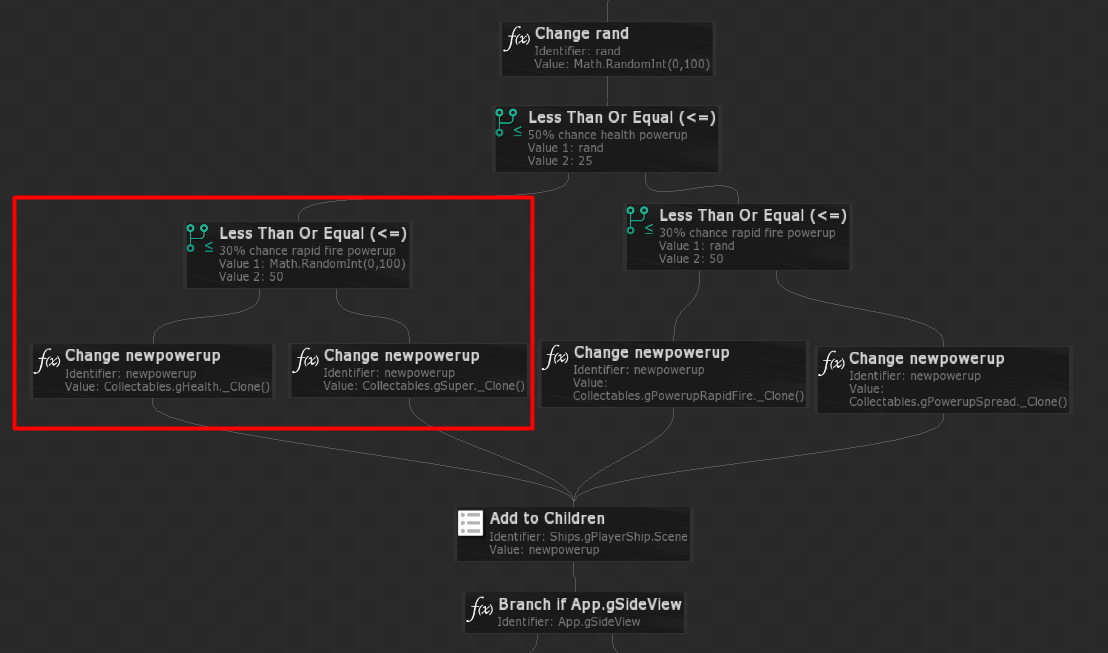
SpawnRandomPowerup and clickEdit Function Script to add the new powerup as a spawning option. - Somewhere in the middle of the script, you will find 2
Less Than Or Equal (<=) branches followed byChange newpowerup functions. - Add another branch function of the same type on the left side of the first one. We will make it so there's going to be a 50/50 chance of spawning either a health or super-speed powerup:
Value 1 =Math.RandomInt(0,100) Value 2 =50
- Now connect its one side to the
Change newpowerup function with a value of "Collectables.gHealth._Clone()", and a new one with a value ofCollectables.gSuper._Clone() . - Make sure the new function is connected to the very next one (
Add to Children in this case) so the script continues smoothly. The updated script should look like this:

- Open
- Add Functionality (1/2):
- Create 3 variables under the "Ship" class.
- Named
mSuperTime ofint (integer) type, and aDefault value of0 . This will track how many seconds of super-speed the player has left. - Named
mSuperTimeMax ofint (integer) type, and aDefault value of7 . This sets the maximum super-speed time in seconds the player will receive upon getting the powerup. - Named
mSuperTimer ofRoot.Timer type, set to run every1 second. This will trigger the script within its Ticked event every second.
- Named
- Select the
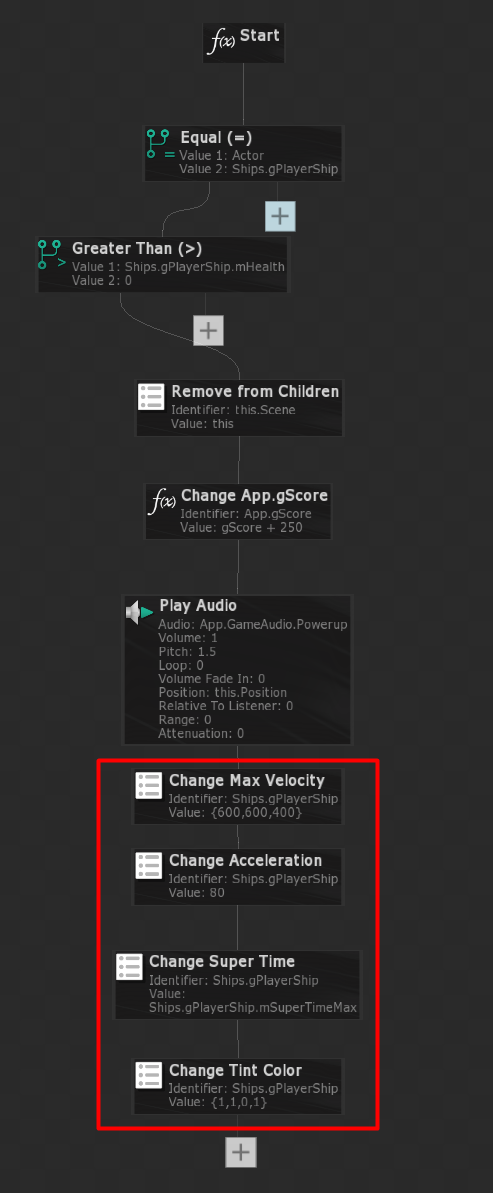
gSuper variable again and open theCollision Actor Started event. This will trigger every time the powerup actor collides with another. Since we copied this one from the health powerup one, we only need to do minimal changes to it. - Remove the
Change Health function and instead put aChange Max Velocity :Identifier =Ships.gPlayerShip Value =600 600 400
TheMax Velocity variable has 3 values because it is a 3D vector type variable, meaning it can store up to 3 values. We are changing all 3 values since we want the ship's speed to increase in all directions/axes. The player ship's default velocity values are300 300 200 , so we're essentially doubling its speed with this powerup. - We're adding a
Change Acceleration function as well, to make the ship pick up to that higher speed easier:Identifier =Ships.gPlayerShip Value =80
- And the most important part to make this all functioning is setting the "mSuperTime" variable to the set maximum that we're storing in "mSuperTimeMax" with a
Change Super Time function:Identifier =Ships.gPlayerShip Value =Ships.gPlayerShip.mSuperTimeMax
- It would also be nice to have some visual feedback to have the player know their state has changed. One way to do that is by changing the color of their ship with a
Change Tint Color function. - For
Identifier useShips.gPlayerShip , and for color preferably yellow. The updated script should look like this:

- Create 3 variables under the "Ship" class.
- Add Functionality (2/2):
- Now select
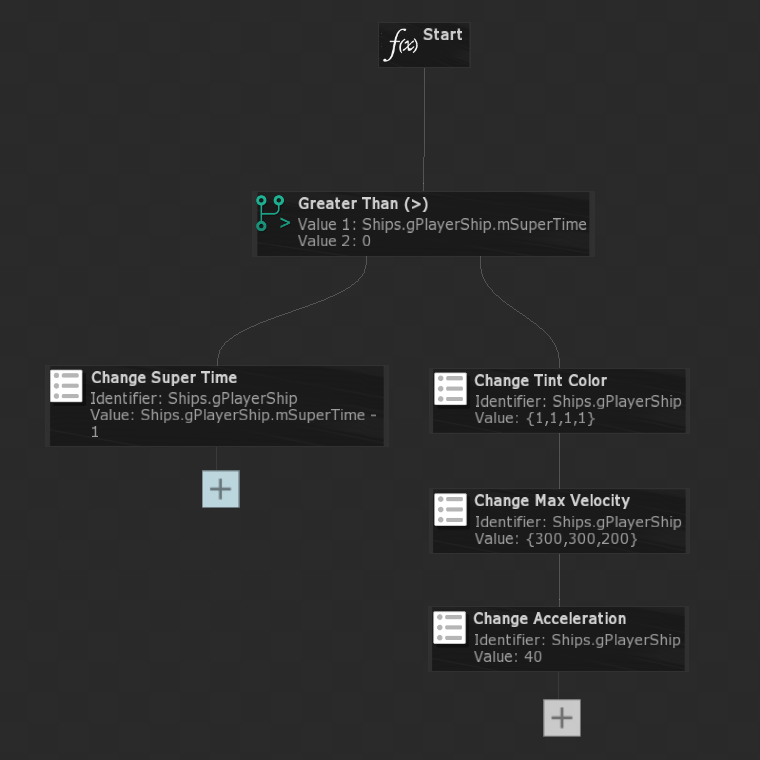
gPlayerShip from the "Ships" folder to edit theTicked event script of its timer by clicking theEdit Ticked button found in its properties. This will handle when to wear off the super-speed effect powerup. - Add a
Greater Than (>) branch for seeing if the player has received the powerup by checking themSuperTime variable.Value 1 =Ships.gPlayerShip.mSuperTime Value 2 =0
- If
mSuperTime is greater than 0, it means the player has recently received the powerup, and since this timer is set to tick every second, we want to reduce that variable by 1 with aChange Super Time on the left path of the branch.Identifier =Ships.gPlayerShip Value =Ships.gPlayerShip.mSuperTime - 1
- If
mSuperTime isn't greater than 0, it means either the player hasn't received the powerup or it has run out. In that case, we want to revert things back to a normal state. - Change Max Velocity:
Identifier =Ships.gPlayerShip Value =300 300 200
- Change Acceleration:
Identifier =Ships.gPlayerShip Value =40
- Make sure to revert the ship's color back to normal (white) using the
Change Tint Color function. The script should look like this:

- Now select
- Test the Game:
- Run the project to verify the new powerup spawns and behaves as expected.
If you think anything is missing, please feel free to: submit documentation feedback on this page
